Moving from manual inspection to automated visual inspection rarely starts with the AI model. It starts with a much simpler question: do we understand what we are asking the system to inspect?
For many manufacturers, the temptation is to jump straight to cameras, software, and full automation. But the strongest projects usually begin earlier, with a clear defect catalogue, a focused first use case, and agreement on what good, bad, and borderline actually mean on the production floor.
This guide is for quality teams, operations leaders, and engineers who are considering the move from manual checks to AI-powered inspection. If you are still looking for the broader definition, start with our guide to automated visual inspection for manufacturing. Here, we will go deeper into the practical preparation: what to document, what data to collect, what questions to ask, and how to start small before scaling across products, lines, or factories.
The Short Answer: Automation Starts Before the Camera
The best first step is to document your inspection knowledge.
That does not mean you need a perfect dataset, thousands of labelled images, or a fully specified automation plan. It means you should start capturing the information your inspectors already use every day: what defects look like, how severe they are, where they appear, which defects matter most, and which visual variations are still acceptable.
A simple defect catalogue can be enough to begin. Add photos of each defect type, examples of acceptable parts, notes on size ranges, location, frequency, and current pass/fail rules. This gives your automation partner a practical starting point and helps your own team align before the pilot begins.
Map Your Current Manual Inspection Process
Before changing the inspection process, write down how it works today.
Where does inspection happen? Is it inline, at the end of the line, in a lab, or at a manual station? Who makes the pass/fail decision? How long does each check take? What happens when a defect is found? Is the part scrapped, reworked, downgraded, quarantined, or sent for second review?
These details matter because automation does not live in isolation. It has to fit into the way products move, decisions are made, and quality data is used.
- Which products or variants are inspected today?
- Which defects are checked visually?
- Which defects are measured?
- Which decisions are subjective?
- Where do inspectors disagree?
- What information is recorded after inspection?
- What information is currently lost?
This step often reveals the real business case. Sometimes the problem is missed defects. Sometimes it is too many false rejects. Sometimes the biggest issue is that inspection data never becomes usable production insight.
Build a Defect Catalogue
A defect catalogue is one of the most valuable things you can prepare before starting an automated visual inspection project.
It does not need to be complicated. A spreadsheet, shared folder, or quality document can work well at the beginning. What matters is that the catalogue gives structure to the inspection problem.
- Defect name
- Visual description
- Example images
- Acceptable and unacceptable examples
- Typical size range
- Common location on the product
- Severity level
- Frequency, if known
- Current action: pass, reject, rework, or review
- Known root cause, if available
The point is not to create paperwork for its own sake. The point is to turn expert knowledge into something a system can learn from and a team can agree on.
This is especially important when defects are rare. If you only see a specific crack, bubble, scratch, dent, contamination mark, coating issue, or inclusion a few times per month, every example matters. A small number of real examples can still be useful, especially when combined with synthetic data for quality inspection to expand the range of defect appearances, lighting conditions, and edge cases.
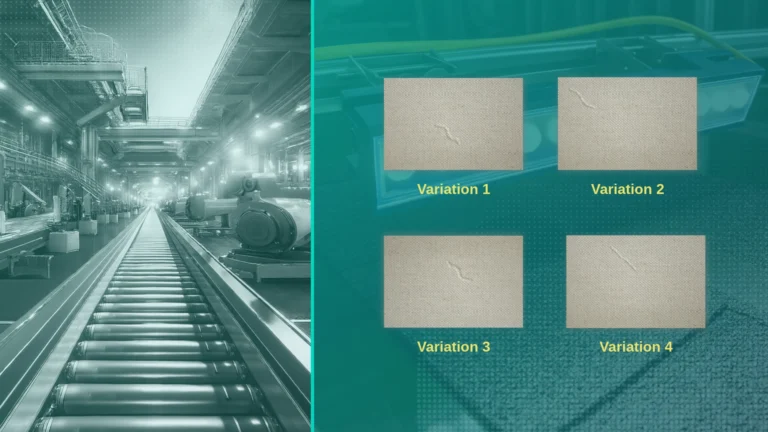
Define Good, Bad, and Borderline Parts
AI inspection is not only about finding defects. It is also about learning what acceptable variation looks like.
This is where many projects get harder than expected. Two experienced inspectors may agree on obvious failures but disagree on borderline cosmetic issues. One shift may reject a mark that another shift accepts. A product may have natural texture, gloss, grain, weave, or colour variation that looks unusual but is still within specification.
If those rules are unclear, the AI system will inherit the uncertainty.
- What is always acceptable?
- What is always unacceptable?
- What requires review?
- Which defects are safety-critical?
- Which defects are cosmetic but commercially important?
- Which defects depend on location, size, contrast, or customer requirements?
Human-in-the-loop inspection is useful here because it does not force manufacturers into full autonomy on day one. With a platform such as Spectron, operators can review uncertain detections, accept or reject results, add comments, and feed that judgement back into the model over time.
Start Small: Choose the First Inspection Target Carefully
Do not try to automate every inspection problem at once.
The strongest automated visual inspection projects usually start with one focused target: a product family, a high-priority defect, a painful manual checkpoint, or a line where the business case is clear. Once that first use case is stable, the same process can be expanded to more products, variants, defects, and stations.
- High enough value to justify attention
- Narrow enough to validate properly
- Painful enough that improvement will be noticed
- Frequent enough to generate useful feedback
- Clear enough that pass/fail rules can be defined
This could be a recurring surface defect, a slow end-of-line check, a high-value product variant, a known source of customer complaints, or a defect category that creates expensive rework.
Starting small gives the team room to fine-tune the implementation. You can adjust lighting, camera placement, model thresholds, operator review, reporting, and escalation rules before scaling. It also helps the production team become familiar with the process instead of feeling that automation has arrived as a sudden black box.
The first use case should teach the organisation how to automate inspection. The second and third use cases should be easier because the workflow is already understood.
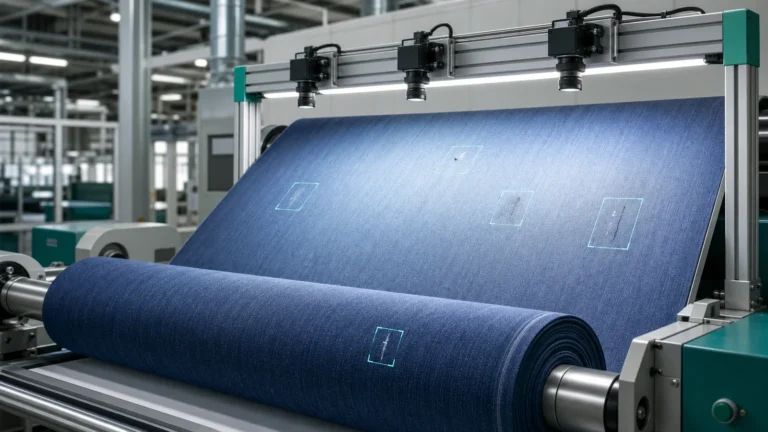
Collect the Right Visual Data
Once the first target is chosen, the next step is collecting useful visual data.
This should include clean parts, defective parts, borderline parts, and normal variation. Do not only collect the most obvious failures. A model also needs to understand what a good product looks like across different batches, shifts, finishes, and lighting conditions.
- High-quality product images
- Defect close-ups
- Full part images showing defect location
- Images from different production batches
- Examples from different variants or SKUs
- Rejected-part images
- Operator comments or inspection notes
- Batch, line, shift, or machine metadata where available
If real defect examples are limited, that is normal. Many manufacturers struggle because the most important defects are also the rarest. This is one reason synthetic data can be useful: it can help generate controlled variations of defects, masks, and metadata when real examples are scarce.
Know the Smallest Defect You Need to Detect
Camera selection depends on the inspection target, not just the camera specification.
One of the most important questions is simple: what is the smallest defect you need to detect reliably?
A 0.5 mm scratch across a small field of view is a different problem from a subtle surface mark across a large panel moving at line speed. The required resolution depends on defect size, field of view, working distance, lens choice, product movement, exposure time, lighting, and whether the inspection needs 2D or 3D information.
- Smallest defect size
- Inspection area
- Product speed
- Whether the part is stationary or moving
- Whether defects depend on colour, contrast, depth, or texture
- Whether one camera angle is enough
- Whether the line has space for lighting, mounts, triggers, and compute
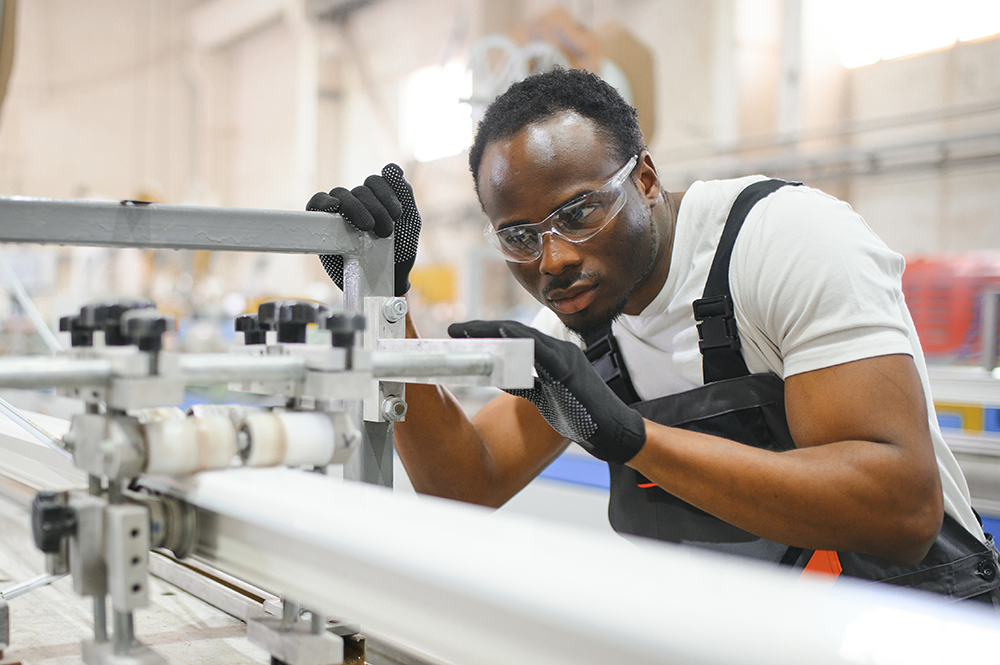
This is where hardware and AI must be designed together. Better software cannot fully rescue poor image capture. A stable inspection system starts with images that make the relevant defect visible in the first place. For teams planning new hardware, our hardware sourcing and deployment process looks at cameras, lighting, compute, calibration, and line constraints together.
Check Lighting, Surface, and Environment
Lighting is often the difference between a defect that is obvious and a defect that disappears.
Glossy, transparent, textured, curved, dark, reflective, flexible, or organic materials can all behave differently under inspection. A scratch may only appear at a certain angle. A dent may need shadows to become visible. A colour defect may need controlled illumination. A transparent product may need a completely different lighting geometry from a matte surface.
The factory environment matters too. Ambient light, vibration, dust, temperature, product handling, and motion blur can all affect reliability.
- Does the defect show under normal lighting?
- Does the surface create glare or reflections?
- Does the product position vary?
- Is the part moving during capture?
- Is the inspection station exposed to changing ambient light?
- Can the setup be enclosed or controlled?
- Does the defect need 3D, multi-angle, or specialised lighting?
This is one reason a pilot is valuable. It lets the team validate the inspection under real production conditions, not just in a clean demo environment.
Decide the Right Level of Automation
Not every manufacturer should jump straight from manual inspection to full autonomy.
Inspection exists on a spectrum. Manual inspection still makes sense when volumes are low, defect criteria are subjective, or expert judgement is needed for unusual cases. Semi-automated inspection can help by giving inspectors better images, highlights, or measurements while leaving the final decision to people.
Human-in-the-loop systems sit in the middle. The AI handles routine detection and classification, while operators stay involved for review, escalation, and feedback. This is often the most practical starting point because it improves consistency without removing human judgement before the team is ready.
Fully automated inspection can be the right goal when the defect rules are clear, data coverage is strong, hardware is stable, and validation proves that the system can make reliable decisions at production speed.
The point is not to choose the most automated option. The point is to choose the level of automation that fits the risk, maturity, and business need of the line.
Define Success Metrics Before the Pilot
A pilot should not begin with a vague goal like improve quality. It should begin with measurable success criteria.
- Reduce false rejects
- Reduce escaped defects
- Increase inspection throughput
- Shorten inspection time per part
- Improve traceability
- Reduce rework
- Standardise decisions across shifts
- Capture defect images and trends
- Improve operator review efficiency
Define what success looks like before deployment. Otherwise, it becomes difficult to judge whether the system is working, whether thresholds are too strict, or whether the first use case is ready to scale.
This also helps align stakeholders. Quality teams may care most about detection and traceability. Operations may care about throughput and downtime. Management may care about scrap, rework, customer claims, and ROI. A good pilot should make those tradeoffs visible.
Plan for Feedback, Reporting, and Continuous Improvement
Automated visual inspection should not only detect defects. It should create useful production knowledge.
A strong system records what was inspected, what was detected, where defects appeared, how severe they were, what decision was made, and whether a human reviewer corrected the result. Over time, that data can support root-cause analysis, audit trails, process improvement, and model refinement.
This is where reporting and human feedback matter. If operators can review detections, correct mistakes, and add context, the system becomes more aligned with the real inspection standard. If dashboards show defect trends by product, line, batch, or shift, inspection becomes a source of production insight rather than only a pass/fail gate.
With platform configuration and reporting, the goal is not just to automate a checkpoint. It is to make inspection data easier to act on.
What to Prepare Before Talking to an AVI Partner
You do not need everything perfect before starting. But the more context you prepare, the faster the conversation becomes useful.
- Your highest-priority product or product family
- The top 3 to 5 defects causing the most pain
- A simple defect catalogue
- Good, bad, and borderline examples
- Target defect sizes
- Product variants and materials
- Current inspection method
- Current inspection time
- Known false reject or escape issues
- Line speed and handling constraints
- Available space for cameras, lighting, and compute
- Reporting, audit, or traceability requirements
If you have images, bring them. If you have rejected parts, keep them. If you have inspector notes, include them. Even imperfect information is useful because it shows how quality decisions are made today.
Where Zetamotion Fits
Zetamotion helps manufacturers move from inspection knowledge to inspection-ready systems.
That can start with something as simple as a defect catalogue and a few product examples. From there, we help define the inspection target, assess the hardware and imaging requirements, generate or curate training data, configure AI models, set pass/fail thresholds, and deploy the workflow through Spectron.
For some teams, the right first step is a focused pilot. For others, it may be a turnkey AI inspection deployment that includes hardware, software, model training, validation, reporting, and support.
The practical path is usually the same: start with the highest-priority inspection problem, learn from the first implementation, then scale with more confidence.
FAQ
Do I need thousands of defect images to start?
No. Large datasets can help, but many real manufacturing defects are rare. A small set of real examples, a clear defect catalogue, and good product references can be enough to begin a feasibility discussion. Synthetic data can help expand coverage when real defect samples are limited.
Can automated visual inspection fully replace manual inspection?
Sometimes, but not always on day one. Many manufacturers start with human-in-the-loop inspection so operators can review uncertain cases, tune thresholds, and build confidence before increasing automation.
What is the best first step before an AVI pilot?
Start by documenting your defect catalogue. Include defect names, images, acceptable examples, unacceptable examples, size ranges, severity, and current pass/fail rules.
How do I choose the first use case?
Choose a product, defect, or inspection station that causes real pain but is narrow enough to validate properly. The first project should help your team learn the process before scaling.
What causes false rejects in automated inspection?
Common causes include unclear defect definitions, unstable lighting, poor image quality, product variation, thresholds that are too strict, and insufficient examples of acceptable variation.
When is human-in-the-loop better than full automation?
Human-in-the-loop is often better when defect criteria are still being refined, when borderline cases require judgement, or when the team wants to build confidence before allowing the system to make final decisions automatically.
Ready to See If AI Fits Your Line?
Start with your highest-priority product, your most painful defect types, and your current inspection workflow. Share your product specs, target defect sizes, and examples of good and defective parts, and we can help map the practical path from manual inspection to a scalable automated visual inspection system.
Start a feasibility inquiry